

Can I See The Htmp Code Of My Mailchimp Template
Reading Fourth dimension: iii minutes
Are yous tired of looking at an ugly MailChimp grade on your website? If so, you're in the correct stop. We're going to review how to customize MailChimp embed class.
Whether you're a blogger, business owner, solopreneur or something in-between, most likely you're collecting email addresses to stay connected with your customers or blog readers. We honey MailChimp'southward like shooting fish in a barrel-to-utilize interface and the diverseness of customization options the service provides.
But 1 matter we do not like about MailChimp is the default signup form. Come across Below.
The importance of maintaining the aesthetics of your website design dictate that yous might want this MailChimp signup course to look completely dissimilar than the default. This ways that you lot'll want to change the fonts, colors, input field or size.
Today, we're going to walk you through the steps to customize your MailChimp form. Follow the steps below to customize your MailChimp embed form. You can follow each pace to get it looking just similar the example or just copy and paste the ending code and supplant with your embed grade lawmaking.
A Step past Step Guide to Customize Mailchimp Embed Class
Follow steps beneath to customize MailChimp embed grade.
1. Go your opt-in grade lawmaking
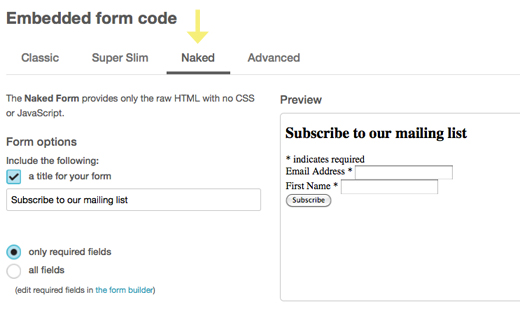
When in your MailChimp business relationship – select the listing you want to create a sign-up class for and choose the 'Naked' option. This class provides only the raw HTML with no styling (CSS or JavaScript). This is the best pick to utilize when customizing your form.
2. Brand the Following Changes to the Code
a) Supersede:
<div id="mc_embed_signup"> with: <div id="mailchimp">
b) Remove ALL <label> tags but keep ALL <input> tags
<label for="mce-E-mail"> Email Address <span form="asterisk">*</span></characterization> You tin can besides remove the extra <div> tags: <div class="mc-field-group"> <div class="clear"> <div form="indicates-required"><span class="asterisk"">*</span"> indicates required</div>
(make sure yous remove the endmost </div> at the finish as well)
c) Customize input field text
Inside the <input> tags is an attribute called value="". Any text you lot put in betwixt the quotes will evidence up by default inside the input form.
For example, if I want the input box to say "Enter your email".
Just do this:
value="Enter your email"
Case for Electronic mail: <input type="email" VALUE="ENTER YOUR Electronic mail" name="E-mail" Class="E-mail" id="mce-Email">
d) Add code to cease of the input field
This code will brand information technology then when people click inside the input field, the default text you add under the value="" aspect will disappear, thus giving them space to enter their info into the form.
Add together this to the very end of the <input> tag:
onfocus="if(this.value==this.defaultValue)this.value='';" onblur="if(this.value=='')this.value=this.defaultValue;" Example: <input type="text" value="Enter your name" name="FNAME" class="name" id="mce-FNAME" onfocus="if(this.value==this.defaultValue)this.value='';" onblur="if(this.value=='')this.value=this.defaultValue;">
f) Accommodate the size of your <input> fields
Adjust the size of your input field as you need.
size="xxx″
Example: <input blazon="text" SIZE="30" value="Enter your name" name="FNAME" class="proper noun" id="mce-FNAME" onfocus="if(this.value==this.defaultValue)this.value='';" onblur="if(this.value=='')this.value=this.defaultValue;">
After these steps your option course should look something like this:
<!-- Brainstorm MailChimp Signup Class --> <div id="mailchimp"> <form action="Supplant with your MailChimp code" method="postal service" id="mc-embedded-subscribe-form" name="mc-embedded-subscribe-form" course="validate" target="_blank"> <input type="electronic mail" size="xxx" value="Enter your email" proper noun="Email" form="required email" id="mce-EMAIL" onfocus="if(this.value==this.defaultValue)this.value='';" onblur="if(this.value=='')this.value=this.defaultValue;"> <input type="text" size="30" value="Enter your name" name="FNAME" class="name" id="mce-FNAME" onfocus="if(this.value==this.defaultValue)this.value='';" onblur="if(this.value=='')this.value=this.defaultValue;"> <div id="mce-responses" grade="articulate"> <div form="response" id="mce-error-response" manner="display:none"></div> <div grade="response" id="mce-success-response" fashion="display:none"></div> </div> <div class="articulate"> <input type="submit" value="Subscribe" name="subscribe" id="mc-embedded-subscribe" class="push"> </div> </form> </div> <!--Cease mc_embed_signup-->
3. Add together styling to your css file
After you added the opt-in form to your website you lot need to make it await prissy. Re-create and paste the following CSS into your website css file.
#mailchimp { background: #f8f8f8; colour: #3D6392; padding: 20px 15px; } #mailchimp input { border: medium none; colour: gray; font-family unit: times new roman; font-size: 16px; font-style: italic; margin-lesser: 10px; padding: 8px 10px; width: 300px; edge-radius: 20px; -moz-border-radius: 20px; -webkit-border-radius: 20px; } #mailchimp input.e-mail { groundwork: #fff } #mailchimp input.name { background: #fff} #mailchimp input[type="submit"] { groundwork: #115B87; color: #fff; cursor: pointer; font-size: 15px; width: 35%; padding: 8px 0; } #mailchimp input[type="submit"]:hover { color: #F2C94C } If you followed all these steps correctly yous should have something that looks like this. Customizing a MailChimp embed grade can be a pain and information technology takes a couple of tries to get it to expect like you want to simply with a footling difficult work your Mailchimp form tin can look peachy.
Receive Electronic mail Updates
Enter your email to receive Uhuru Insider updates.

Can I See The Htmp Code Of My Mailchimp Template,
Source: https://uhurunetwork.com/customizing-mailchimp-form-design/
Posted by: wilsonsirtho.blogspot.com
0 Response to "Can I See The Htmp Code Of My Mailchimp Template"
Post a Comment